 shows off her winter lantern to English pre-school lead teacher Chris Van Buskirk")
Danish-born Asta Fris-Lodahl (age 6) is in full flow when we meet at House of Knowledge International School and Kindergarten’s Quanfa Campus (HoK). She regales us with stories, breaks into song, dance, and impersonations, even restyling my hair at one point. A natural performer and entertainer, she and older sister Laura (8) are genuine movie stars! Both girls had roles in upcoming feature film The Last Race , acting alongside British star Joseph Fiennes. Asta’s dad Jesper Lodahl is CEO of Smartots, and mom Charlotte Friis-Lodahl is a product marketing consultant. The Lodahls moved to Beijing in 2004, when Friis-Lodahl’s work for Nokia brought her to Beijing.
American Chris Van Buskirk, the English pre-school lead teacher at HoK, has planned a craft perfect for wintry nights and especially useful for HoK students: HoK’s 9th Annual Family Lantern Walk, which marks the feast day of St. Martin, will take place later this month on November 13. (For more information on joining the walk, see p8). Van Buskirk recommends inserting an LED tea light into the finished lantern to really make the drawings glow.
Estimated time: 30 minutes
Suitable for: Age 5+ (adult supervision required)
Materials
• Card
• Paper
• Wax paper or translucent paper
• Scissors
• Crayons
• Double-sided sticky tape (or hot glue gun)
• Hole punch
• String

1.Cut out all your paper shapes. Two 15 x 15cm squares of thick paper (these will be the tops and bottoms of you lantern), four 15 x 3cm strips of thick paper (these will be the supports for your lantern), and one 40 x 15cm strip of wax paper or equivalent transparent paper (this will cover the outside of your lantern.
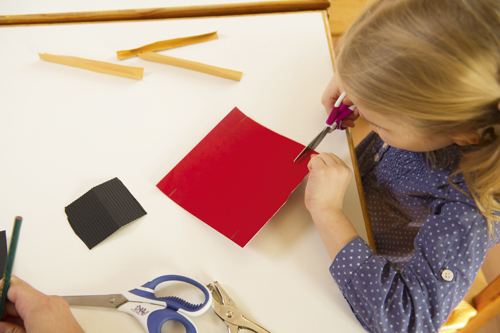
2.Cut the tops and bottoms. Cut four slots on both 15 x 15cm squares, and cut a small square on the middle of your top 15 x 15cm square.

3.Folding. For both 15 x 15cm squares fold inward along each side, and for each corner that was cut, fold a small section inward so that it overlaps with the other side, and fold together. The finished top and bottom should look like very shallow boxes. Fold each 15 x 3cm strips in half, lengthwise.

4.Decorate the transparent paper with crayons.
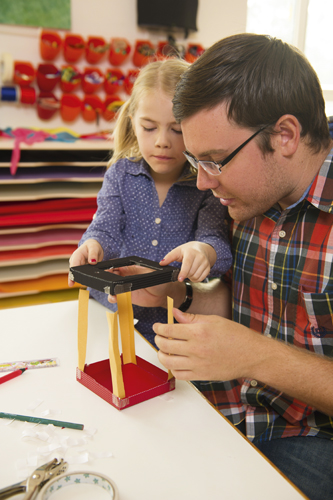
5.Taping the lantern together. While child is decorating, the parent should begin taping the top and bottom squares using double-sided tape. Once the bottom and top squares are taped, place the four 15 x 3cm folded strips in each corner of the bottom square (they should stand upward and fit nicely in the corners since they are folded). After the strips are placed in the bottom, place the top square onto the four strips of paper. This forms the lanterns frame.

6.Wrapping your lantern. Take the long transparent paper that has been decorated and wrap it along the four sides of your lantern (it sticks to the double-sided tape we used earlier).

7.Final touches. With the hole punch, make two holes on the top of your lantern outside of the small square in the middle (make sure they are lined up with one another). Take a piece of string and loop it through each hole, tying a simple knot at each end. This is how you’ll hold your lantern.
This article originally appeared on page 36-37 of the beijingkids November 2015 issue. Click here to read the issue for free on Issuu.com. To find out how you can get your own copy, email distribution@truerun.com.
Photos by Dave’s Studio


